GitQlient User Manual!
GitQlient, pronounced as git+client (/gɪtˈklaɪənt/) is a multi-platform Git client originally forked from QGit. Nowadays it just keeps some old functionality to store the data that is used to later paint the repo tree.
- Home
- Initial screen
- Quick access actions
- The Tree view
- The Diff view
- The Blame & History view
- The Merge view
- Appendix A: Releases
- Appendix B: Build
- Appendix C: Contributing
- Appendix D: Recognition
- Appendix E: License
GitQlient is maintained by francescmm
GitQlient User Manual
Introduction
GitQlient, pronounced as git+client (/gɪtˈklaɪənt/) is a multi-platform Git client originally forked from QGit. Nowadays it goes beyond of just a fork and adds a lot of new functionality.
The original idea was to provide a GUI-oriented Git client that was easy to integrate with QtCreator (currently shipped as GitQlientPlugin). This idea has grown since the day 1 to not only cover the integration with QtCreator but also to make it an app on it’s own.
The primarily idea behind GitQlient was to modernize the old code that QGit is based on and provide a easy UI/UX that I was actually missing on other clients. That was achieved in the version 1.0.0 of GitQlientPlugin in December. On that version, some features that were not part of QGit were included to make it easier to handle the Git repository.
After that, I felt free to open the gates for the big new features that I was actually missing in some of the Git clients I was using. Among the features I was missing, one in particular was really painful: most of the apps only allow one repository opened at the same time. That’s why I decided to include the feature of multiple repositories in the same view as part of GitQlient since version 1.0.0.
This was one feature, but there are several other. Some of them are application-based but other’s are related with the spirit of the open source.
But, what that means exactly?
There are several things, but I feel that two in particular are missed most of the time. The first one is a good documentation. I’m not talking only about adding Doxygen documentation to the header files or the APIs. I mean also to provide documentation about how the application is designed and why I did it in that way. I’d like that this technical documentation helps whoever wants to contribute to the project.
The second thing I’ve been missing is a proper User Manual. After several years in the software industry, I’m aware that one thing is writing the code of an application and another completely different is to be able to explain how to use it. When I write the code of a project or a feature, I don’t need to write a User Manual to know how it works; I’ve created it!
But, what happens if you want to introduce as much people as possible? Well, then we need a User Manual that tells them exactly how things work. What options they have and how to deal with possible mistakes or errors.
This document tries to cover exactly that.
Glossary
Here you can find all the specific glossary that will be used in this document referring to GitQlient:
- WIP: Work in progress. Usually refers to the local modification in files of the repository that are not committed yet.
What is included in GitQlient
As I explained in the introduction, GitQlient support multiple repositories opened at the same time. All repositories are managed in the same isolated way. All the features of GitQlient will be presented along the User Manual: all of them apply to all the opened repositories individually. Unfortunately there are no cross-repository features.
Since the beginning I divided GitQlient three big sections depending on their functionality:
These views, when enabled, can be accessed by the Controls placed at the top of the repository window.
There is another view but is not accessible always: it is the Merge View. This view is visible and accessible when GitQlient detects that there is a conflict caused by a merge, cherry-pick, or pull action.
Executing GitQlient from console
GitQlient can be executed from command line with additional params. Please take a look to the following table:
| Command | Description |
|---|---|
| -noLog | Disables the log system for the current execution |
| -logLevel | Sets the log level for GitQlient. It expects a numeric: 0 (Trace), 1 (Debug), 2 (Info), 3 (Warning), 4 (Error) and 5 (Fatal). |
| -repos | Provides a list separated with blank spaces for the different repositories that will be open at startup. Ex: -repos /path/to/repo1 /path/to/repo2 |
Initial screen
The first screen you will see when opening GitQlient is the Initial screen. It contains buttons to handle repositories and three different widgets:
- GitQlient configuration
- Most used repositories
- Recently opened repositories
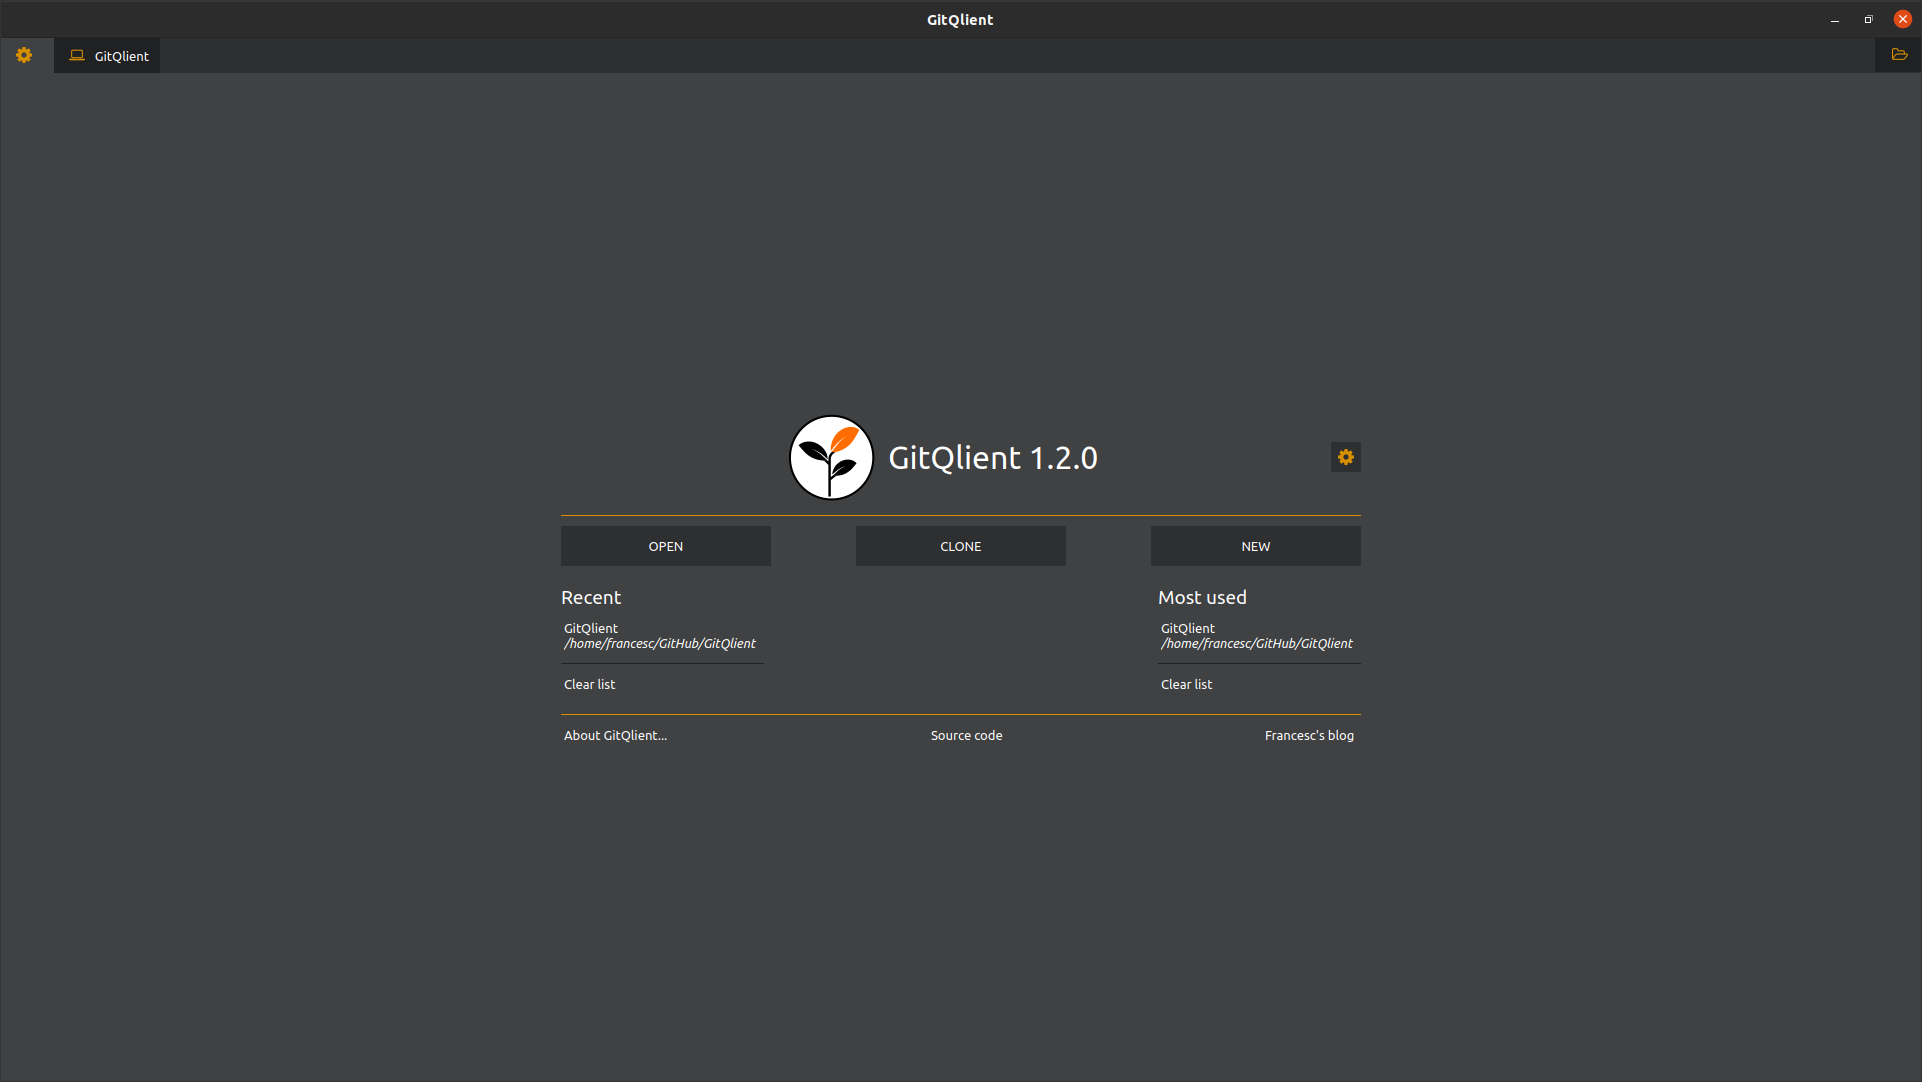
- GitQlient configuration
- Initializing a new repository
- Cloning a remote repository
- Open an existing repository
GitQlient configuration
In the GitQlient configuration (small button in the right to the logo), you can change some internal parameters that GitQlient uses to update the view and internal data. The available options are:
- Disable logs: if active, it disables GitQlient logs.
- Log level: Allows you to choose the threshold of the levels that GitQlient will write. The higher level, the lesser amount of logs.
- Styles schema: For the moment you can choose between dark (default) and bright color schema.
Initializing a new repository
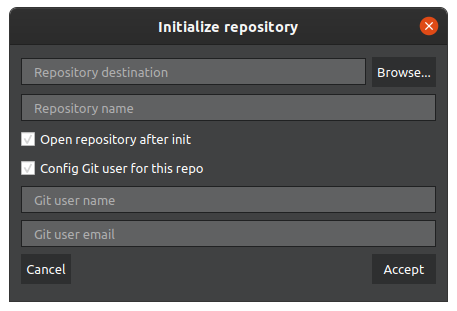
To create a new local repository you have to click over the option Init new repo. It opens a dialog to set all the information that Git needs. This is:
- Destination of the repository (where it will be stored locally)
- Repository name: the name of the repository (refers to the folder name of the project)
In addition, you can configure the Git user by checking the checkbox GitQlient will open the repository after it’s created.
Cloning a remote repository
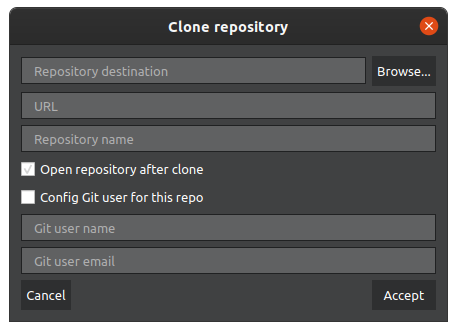
To clone an existing remote repository you have to select the option Clone new repo. After clicking the button, it will show a dialog that ask for all the necessary data that Git needs to clone a repo. That is:
- Repository destination: where the repository will be stored.
- URL: The remote URL for the repository.
- Repository name: it’s automatically filled with the repo name from the URL, but can be changed if wanted.
In addition, there are two options after the clone action takes place:
- Checkbox to open the repo in GitQlient.
- Checkbox to store the user data for this repository.
Open an existing repository
If you want to open an already cloned repository, the button *Open existing repo” openes the file explorer of the OS to select the folder that contains the repository:
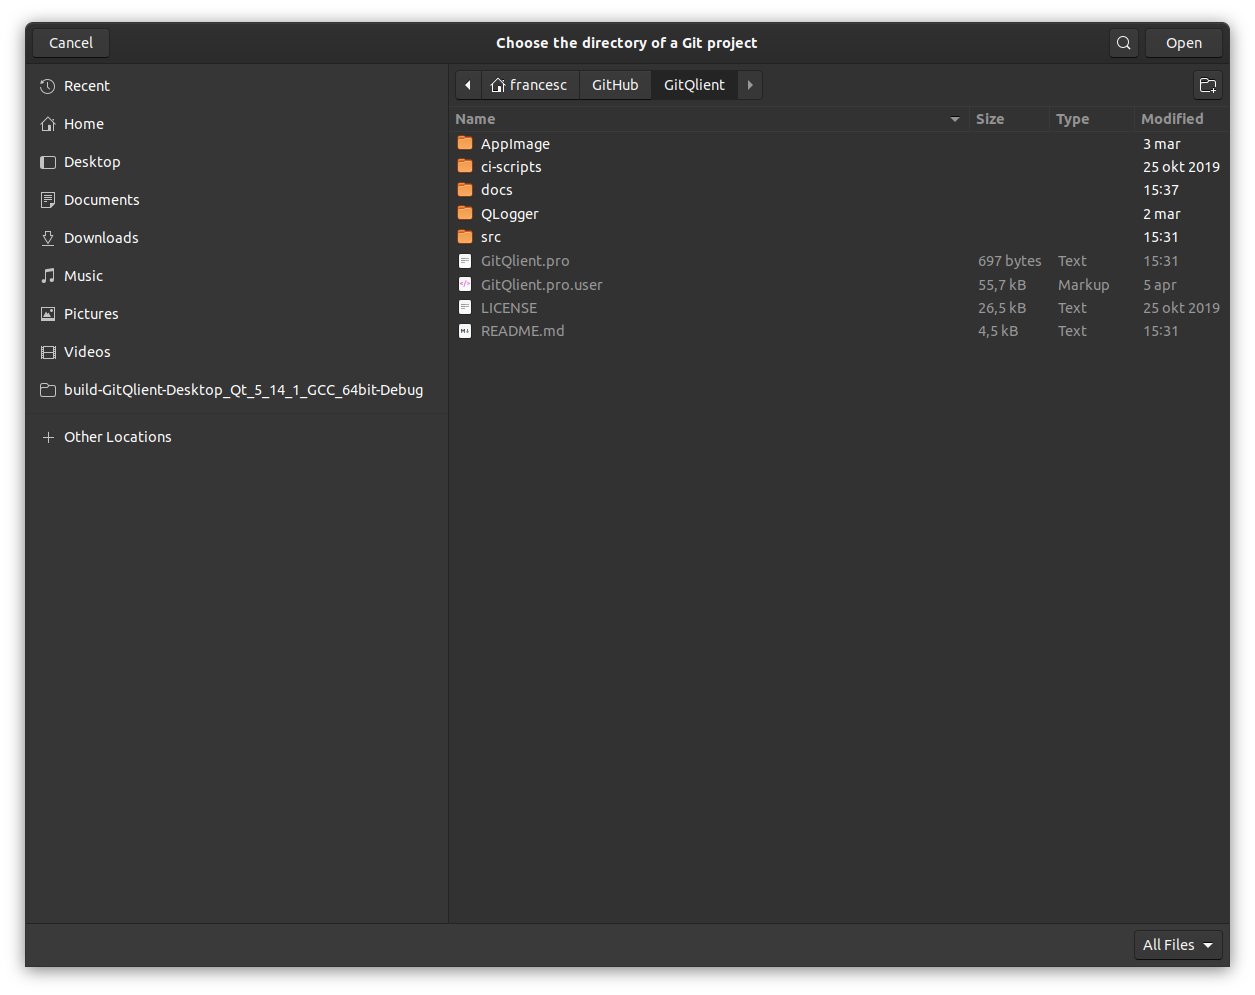
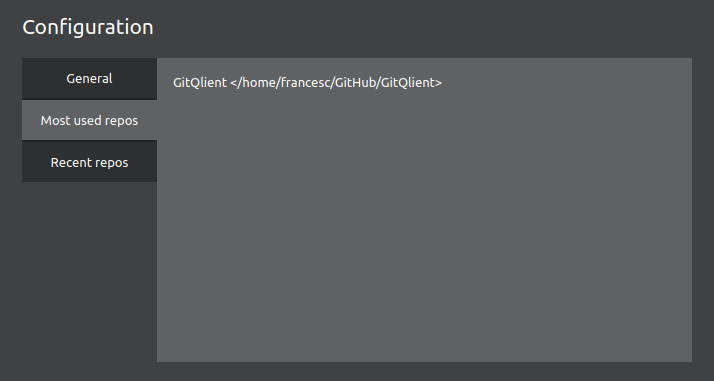
In addition to this, you can select any of the projects listed in the Most used repos list or in the *Recent repos” list:
Quick access actions
Once you have selected and opened our repo, the new view shows in first place a series of controls to manage the most used actions done in Git. This controls are organized horizontally as squared buttons as the following image shows:


The first three buttons reference the different views of GitQlient. They allow you to navigate GitQlient in a simple and easy way. The button changes its color when the view it refers is being dispayed:
- View: This is the main view and shows the tree view, information about the commits, the WIP, branches, tags, stashes and submodules.
- Diff: This options is disabled by default and is only active when a diff is opened. When active, it shows the opened diffs we have.
- Blame: The blame option shows the view there you can see the commit history of any file, the blame for each selected file and a view of the files in the current repository folder.
After that, you can find three buttons that trigger three of the most used Git commands. These are placed here to make you easier to sync the data between the remote and the local repository. Some buttons have an arrow that indicates that the buttons have several options. Press the arrow to select the desired Git command:
- Pull: By default, it performs a Git Pull command. When the dropdown menu is pressed you will find find other options:

* Fetch all: Fetches branches, commits and tags. If your current branch is behind the remote branch after fetching, GitQlient will ask if you want to pull the new changes.
* Pull: This is the default behaviour.
* Prune: Prunes all remote deleted tags and branches.
- Push: It performs the regular push (not forced) command.
- Stash: It does not have a default command. Instead you have to press the dropdown menu to see the different options:

* Stash push: Pushes the stash to your local repository.
* Stash pop: Pops the latest stash that you pushed.
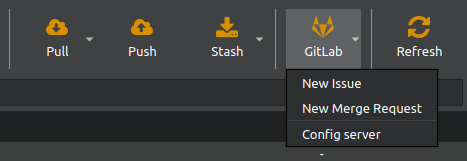
- GitHub/GitLab: This option displays a menu where you can configure your remote Git platform: GitHub or GitLab. In addition you can create Issues and Pull Requests from here.
- Refresh: This option performs a deep refresh of the repository cache. It reloads cache, views and branches information. This is costly so please take it into account when you trigger it. It’s usually helpful to use if you have performed Git actions outside GitQlient and you want to sync.
- Config: The last option opens the repository config dialog. For now, it shows the user data for the current repository:
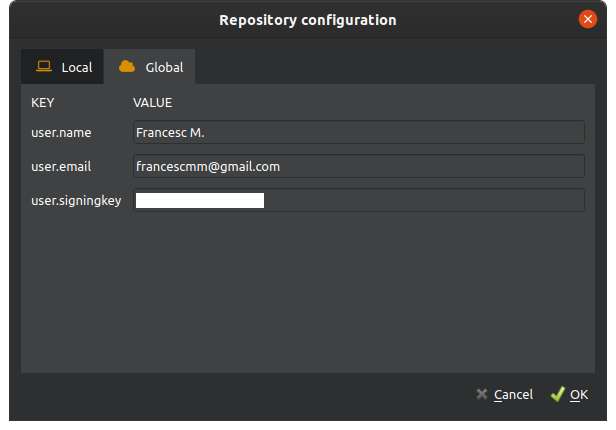
The repository configuration dialog shows the configuration of your .gitconfig file. For the moment only the options about the current user are displayed. You can modify them, of course.
The Tree View
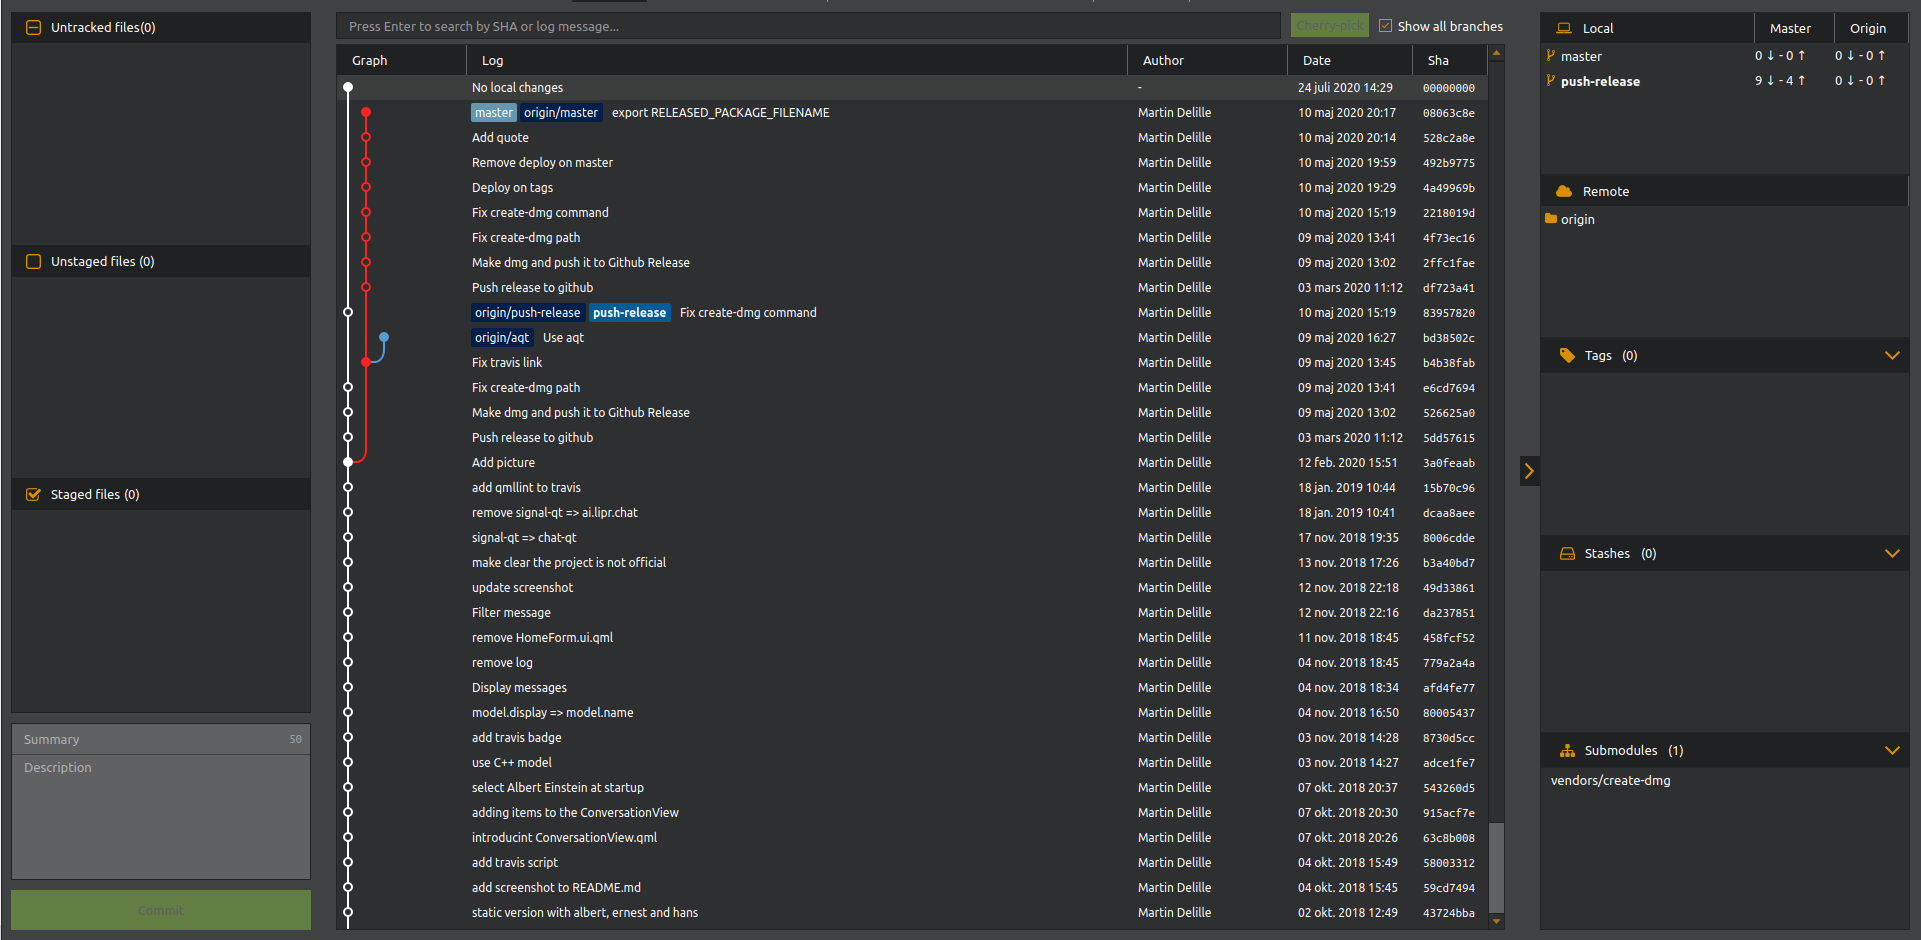
The tree view is divided in three different sections:
- In the center you can find the graphic representation of the repository tree.
- In the right side, GitQlient displays information about the local & remote branches, tags, stashes and submodules.
- In the left side, GitQlient shows the information about the commit you select in the tree view. It will vary depending on if you select the work in progress or a commit.
The repository graph tree
The repository graph tree is as it’s name says: the graphical representation in a form of a tree of the state of your repository. It shows all the branches with their branch names, tags and stashes.
By default, the order is done by date but in future release will be configurable.
In the top of the view you can find a long control to input text. There you can search a specific commit by its SHA or by the commit message. At the end of the input control, you will find a checkbox that when it’s active the view shows all the branches. In case you want to work only with your current checked out branch, you can uncheck it and the view will be updated.
You can interact with the header of the graph view. That includes re-ordering all the columns and resizing the Graph column only. The log column will stretch automatically but all columns will keep a minimum size so the text is readable. In addition, the tool tip information is enabled in every line of the view. It will show the commit SHA, the user and date of the commit and if available, the branches on that commit.
Commit selection
The tree view supports multi-selection and the context menu will vary depending on how many commits you select. The different actions you can do to a commit are:
- Double click a commit: It opens the commit diff between the double clicked one and its direct parent.
- Single click: allows multiple selection by using the Shift key (range selection between 2 commits cliked), accumulative individual selection with the Control key, and click and slide that will select all the commits between the press and the release of the mouse.
If you select two commits, you will be able to see the diff between them by selecting that option in the contextual menu.
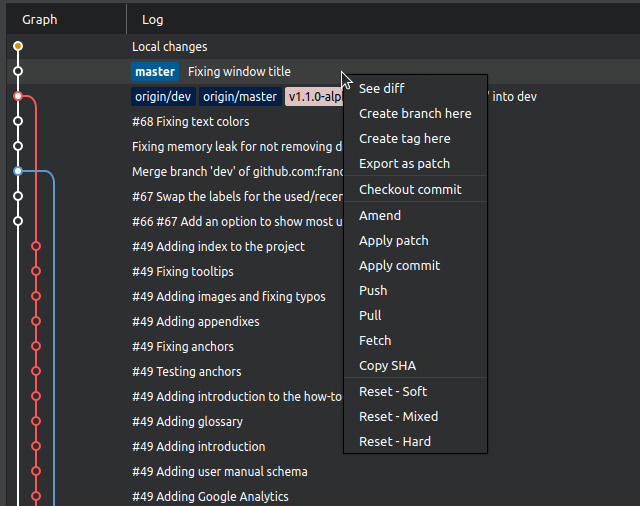
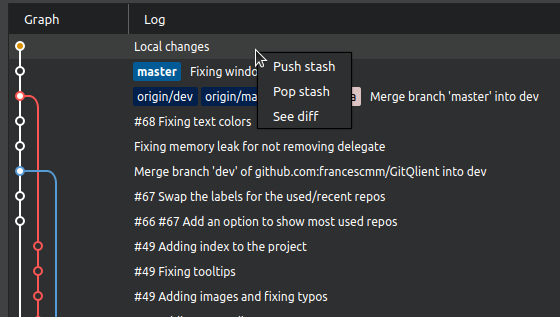
Over the selection you can perform different actions:
- On commit selected:
- If the commit is the last one you will find the following options:
- If the selection is the work in progress:
- If the commit is the last commit of a different branch:
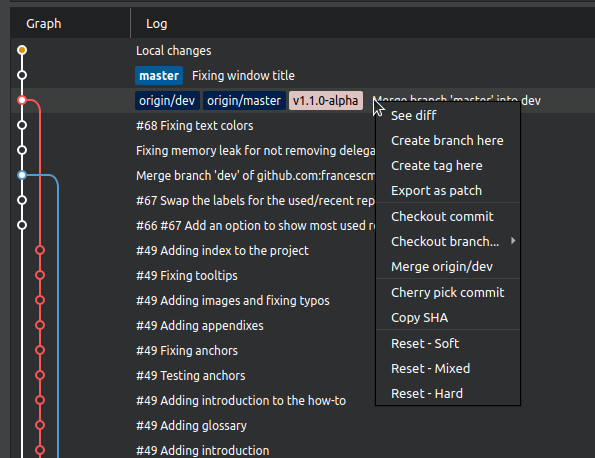
- If the commit select is in a different branch and is not the last one, you will have the same options that before but without the Checkout branch… and Merge options.
- If the commit is the last one you will find the following options:
WIP view
When you select the first entry in the graphic tree view when the text says Local changes, it will show the information of your local uncommitted changes in a widget on the left side of the graphic view:
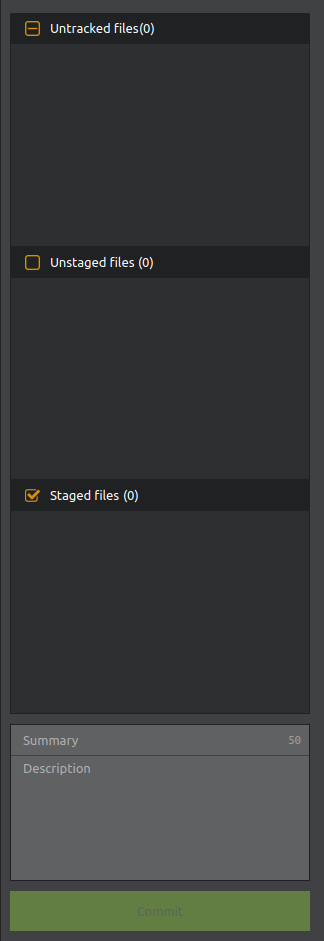
This view is divided in four sections. The first list shows the files that are untracked in your local repository. The second list shows the files that have local modifications. Following that you will find the third list with the changes that are already added to the next commit. Finally in the bottom of the view, you have two input controls where you can add the title of the commit (up to 50 characters), the description for long explanatory texts and a button to commit.
To change the status of a file you can press the plus/minus button or open the contextual menu. The contextual menu will vary depending on the view:
Untracked options:
- Stage file: Moves the file to the stage list.
- Delete file: Deletes the file without confirmation. The reason is that it’s an action not that common and you can recover the file most of the time.
Unstaged options:
- See changes: Opens the diff view with the changes between the current work and the last commit.
- Blame: Opens the blame and history view showing the selected file.
- Stage file: Moves the file to the stage list.
- Revert file changes: Reverts all the changes of the file selected.
- Ignore file: Adds the file name to the ignore list of Git.
- Ignore extension: Adds the file extension to the ignore list of Git.
- Add all files to commit: Moves all files in the list to the staged list.
- Revert all changes: Reverts all the changes in all the files.
Staged options:
- Unstage file: Moves the file to its previous list. When amending it moves the file to the unstaged list.
- See changes: Opens the diff view with the changes between the current work and the last commit.
WIP diff view
In the version 1.2.0 the Diff View for the WIP has been move to the main screen to facilitate the staging and to reduce UI interactions. In addition, the WIP diff view includes some extra options not present in the normal diff view:

- Edition mode: Allows you to edit the WIP file.
- Stage: Allows you to stage the current file.
- Revert: Reverts all the changes made in the WIP.
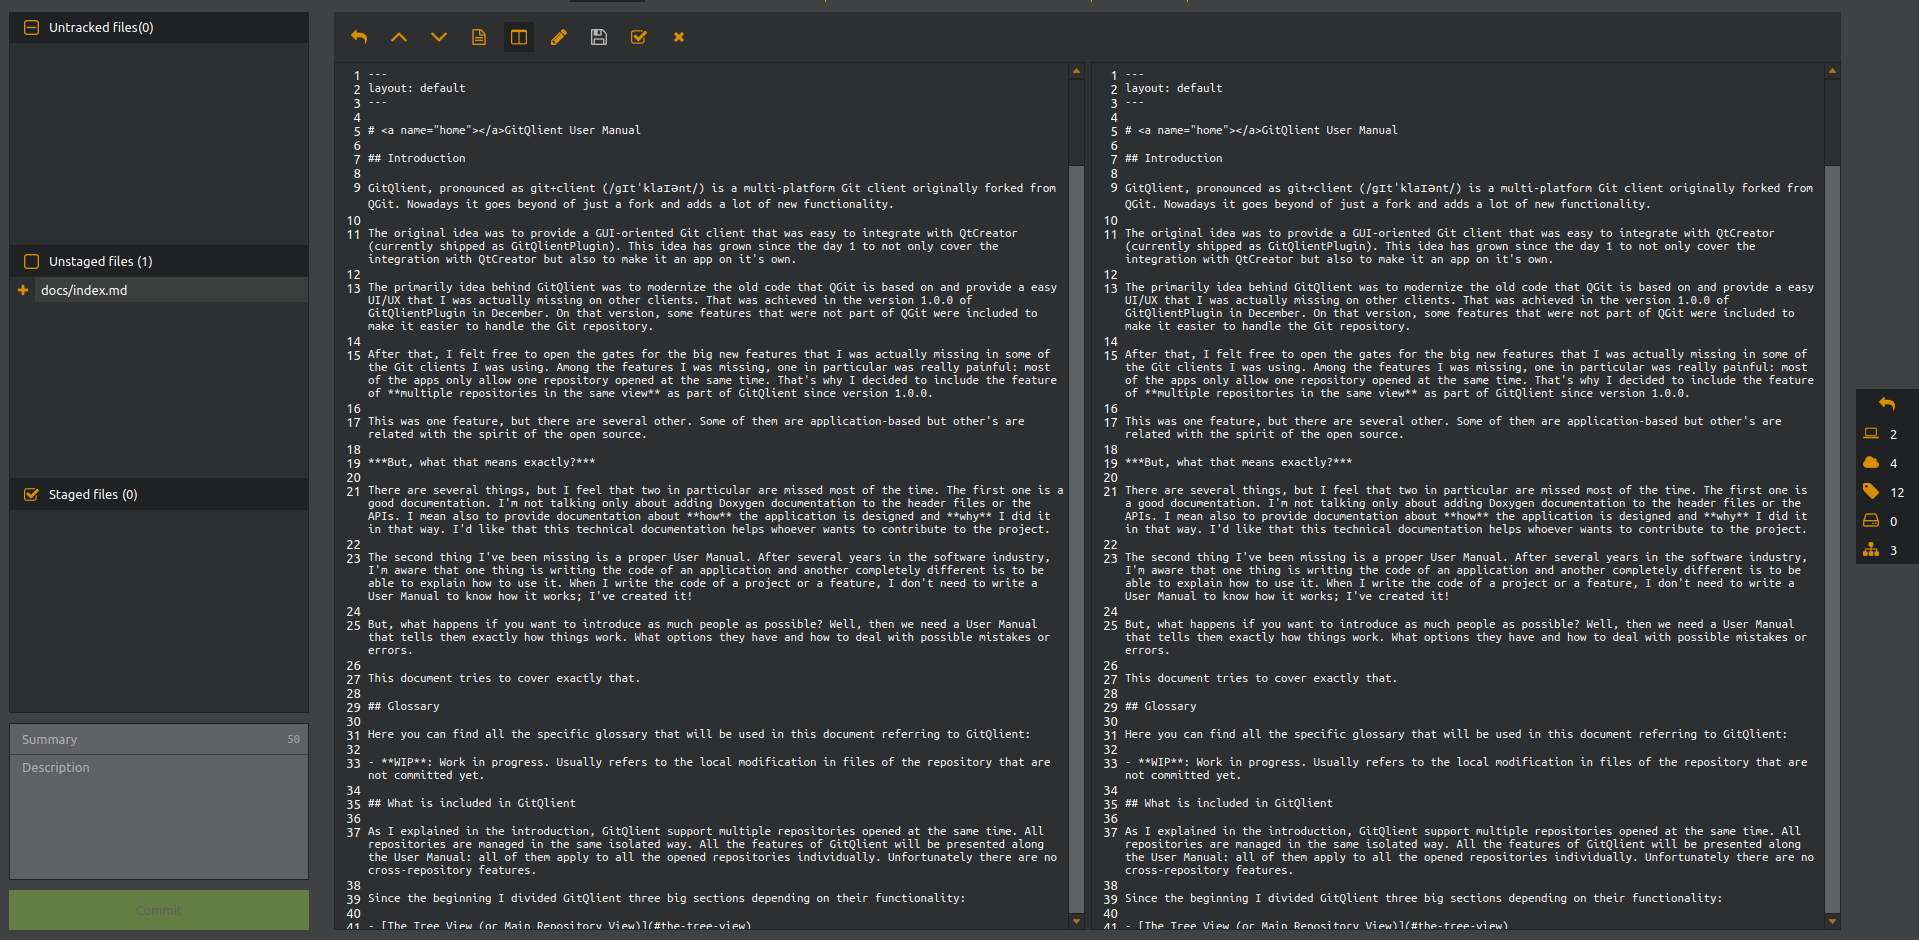
When entering in this mode, the branches menu has changed as well: it shows a minimal view that can be expanded.
WIP edit view
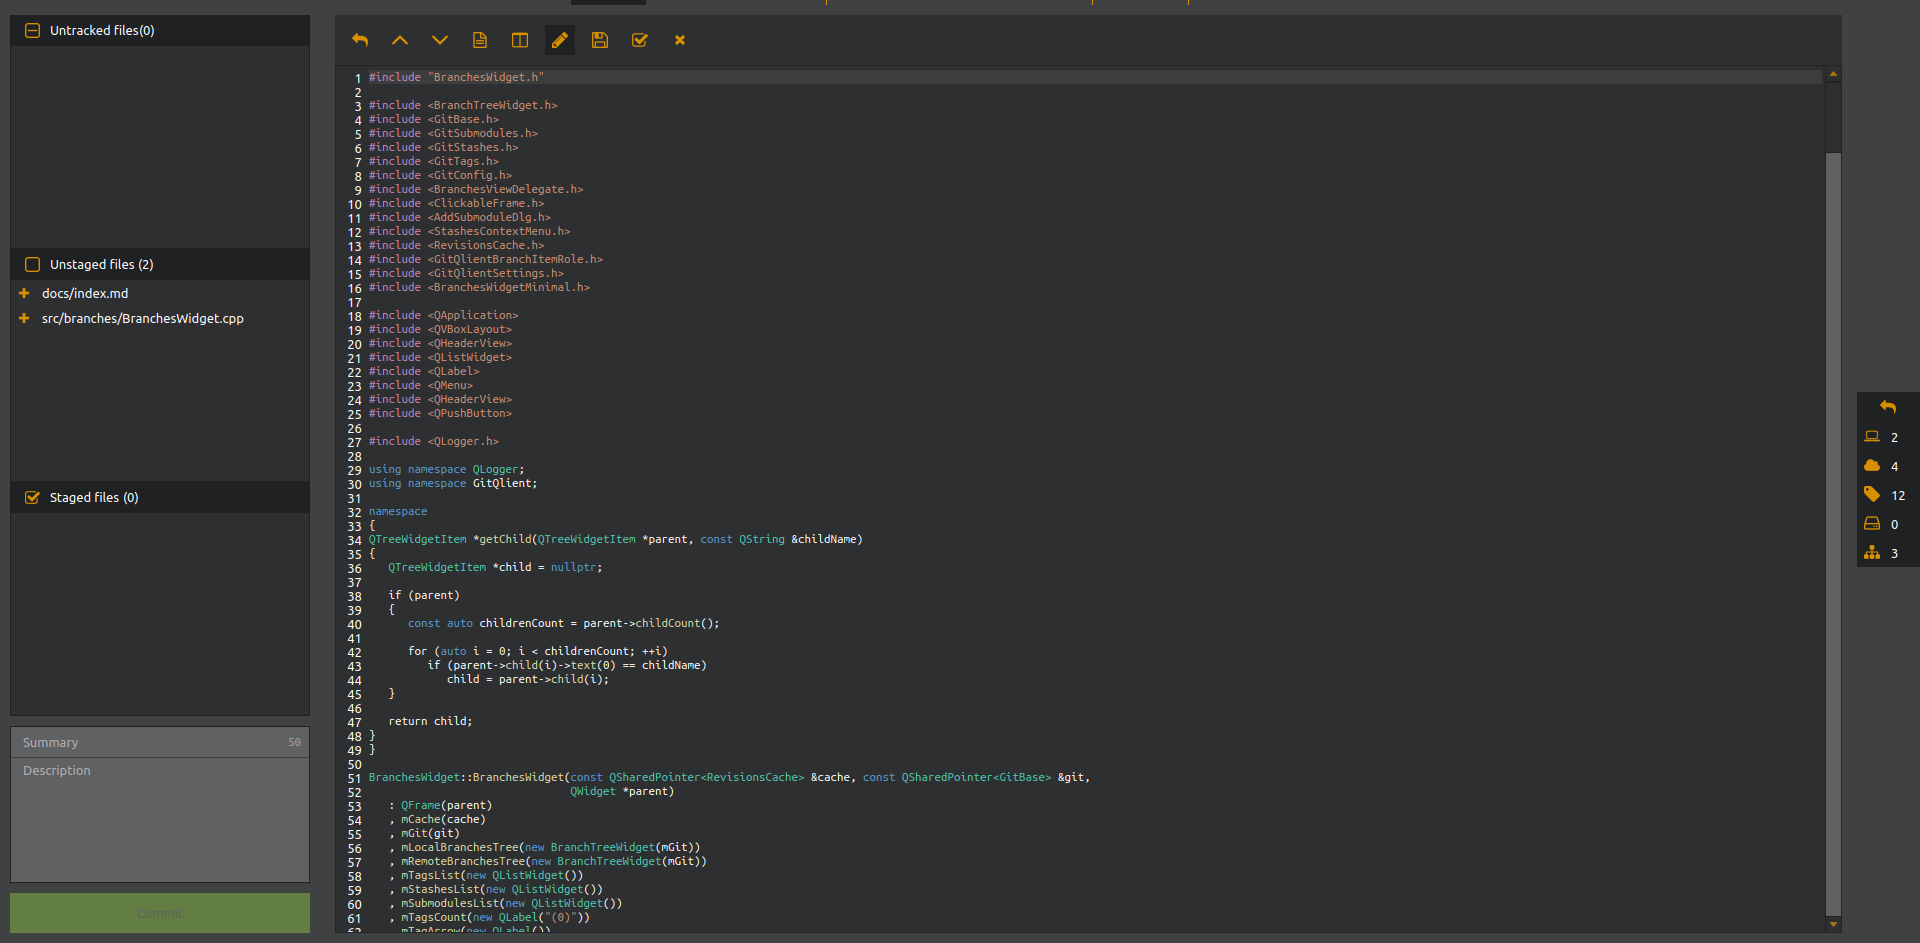
To enter the edition mode you have to press the edit button (Pencil icon) and the file will be opened. For now, only C++ has syntax highlight and it cannot be edited. However it will change in future versions.
Amending a commit
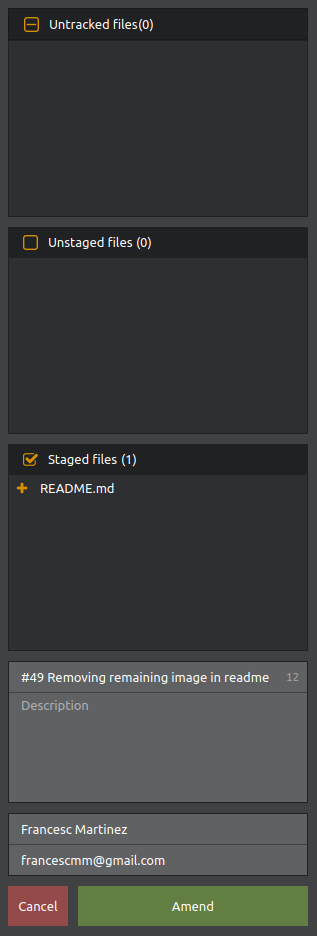
The same view applies when you want to amend a commit it just have some minor differences.
One difference is that the title and description will be filled with the information from the commit you are amending. Another difference is that the confirmation button will change its text to Amend and a Cancel button will be displayed.
The Cancel button closes the interactive view of an amend and returns to the normal Commit info view.
Commit info view
When you select any commit in the graphic tree view, the information about that commit will be displayed in the left side of the window.
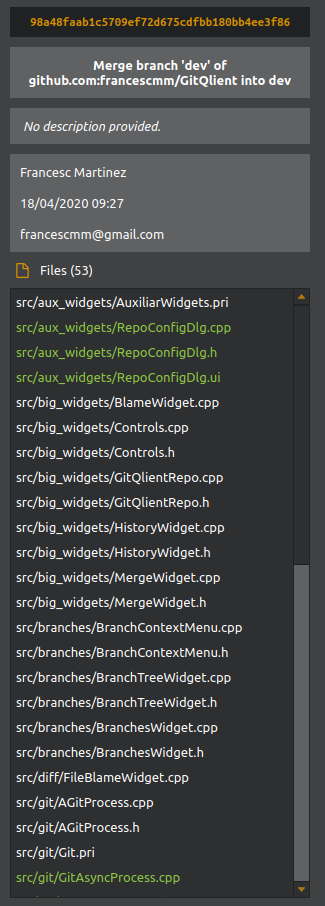
The commit info view is divided in two main sections: the information about the commit, and the list of files that were modified in that commit.
Starting from the top of the view you can find the commit SHA followed by the title, the description, and then, the information about the user that made the commit.
After that you can find the list of files that were modified.
- Double click if you want to open the diff of that file compared to its previous commit or the other commit selected.
- Right click to see the options in the context menu:
- Blame: Shows the blame of that file starting on the commit selected.
- Diff: Shows the diff of that file.
- Copy path: Copies the absolute path where the file is located.
Branches information panel
The branches information panel is located at the right side of the graphic tree view. It shows information about branches (both local and remote), tags, stashes and submodules.
Starting from top to bottom, you can find the local and remote branches view:
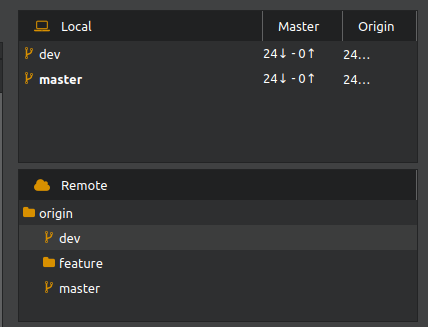
You can perform the following actions:
- Double click a branch to check it out.
- Single click a branch to position the selection of the tree view on the commit of that branch.
- Right click on a branch to show the context menu.
The context menu will vary in case you select your current branch or not. If the current branch is not selected, it will show the Merge action. In the case that display the context menu of your current branch, the push and push force options will be displayed.
The branches are grouped by their path as if it was a file system path. That means that every word followed by a slash will be treated as folder:
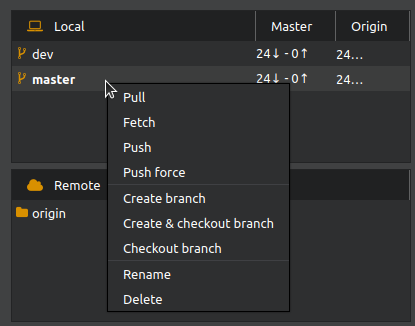
In the right columns you can find information about the distance in commits from the branch to the local master branch and the distance in commits from the branch to its origin branch.
The next view is the tags view. It shows all the tags and differentiates those that are already pushed and the local ones.
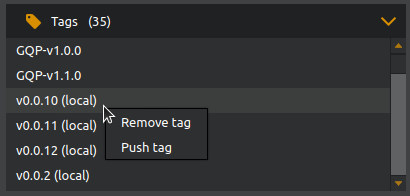
As the branches, it has the same click behaviour. The context menu provides the following options:
- Remove tag: removes the selected tag.
- Push: pushes a local tag to the remote repository.
The next view is the stashes. As the branches, it has the same click behaviour. The context menu provides the following options:
- Branch: creates a branch on that stash.
- Drop: drops the selected stash.
- Clear all: drops all the stashes.
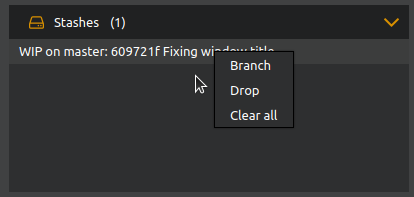
Finally, the last view is the submoules view. Since a submodule is basically a link to another repository the click behaviour changes a bit.
- Add a submodule: To add a submodule, right click on the background of the list. This will show the Add option. After selecting it, GitQlient will show a dialog where you can add the URL and the name of the submodule.
- Open a submodule: If you want to open a submodule in a new GitQlient view, you can double click over it or choose Open in the context menu.
- Update a submodule: To update a submodule, please select Update in the context menu.
Fold behaviour
It is possible to fold the branches widget by clicking on the left button (arrow pointing right). It will fold the widget and show a minimalistic version:

You can unfold by pressing the back button (arrow pointing left)
To help you to keep a reference of the information in the different tables, you can clicking over an icon and it will show a menu with the branches, tags, etc.
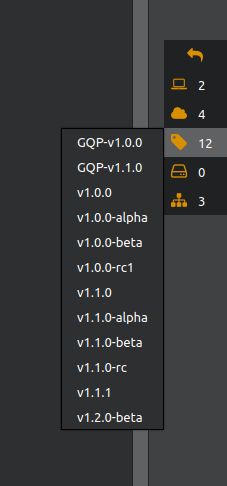
Tables fold behaviour
It is possible to fold the tags, stashes and submodules view. Just click over the title of the list and it will fold. To unfold, click over the header again. This will give you more space if you want to concentrate in the branches.
The Diff View
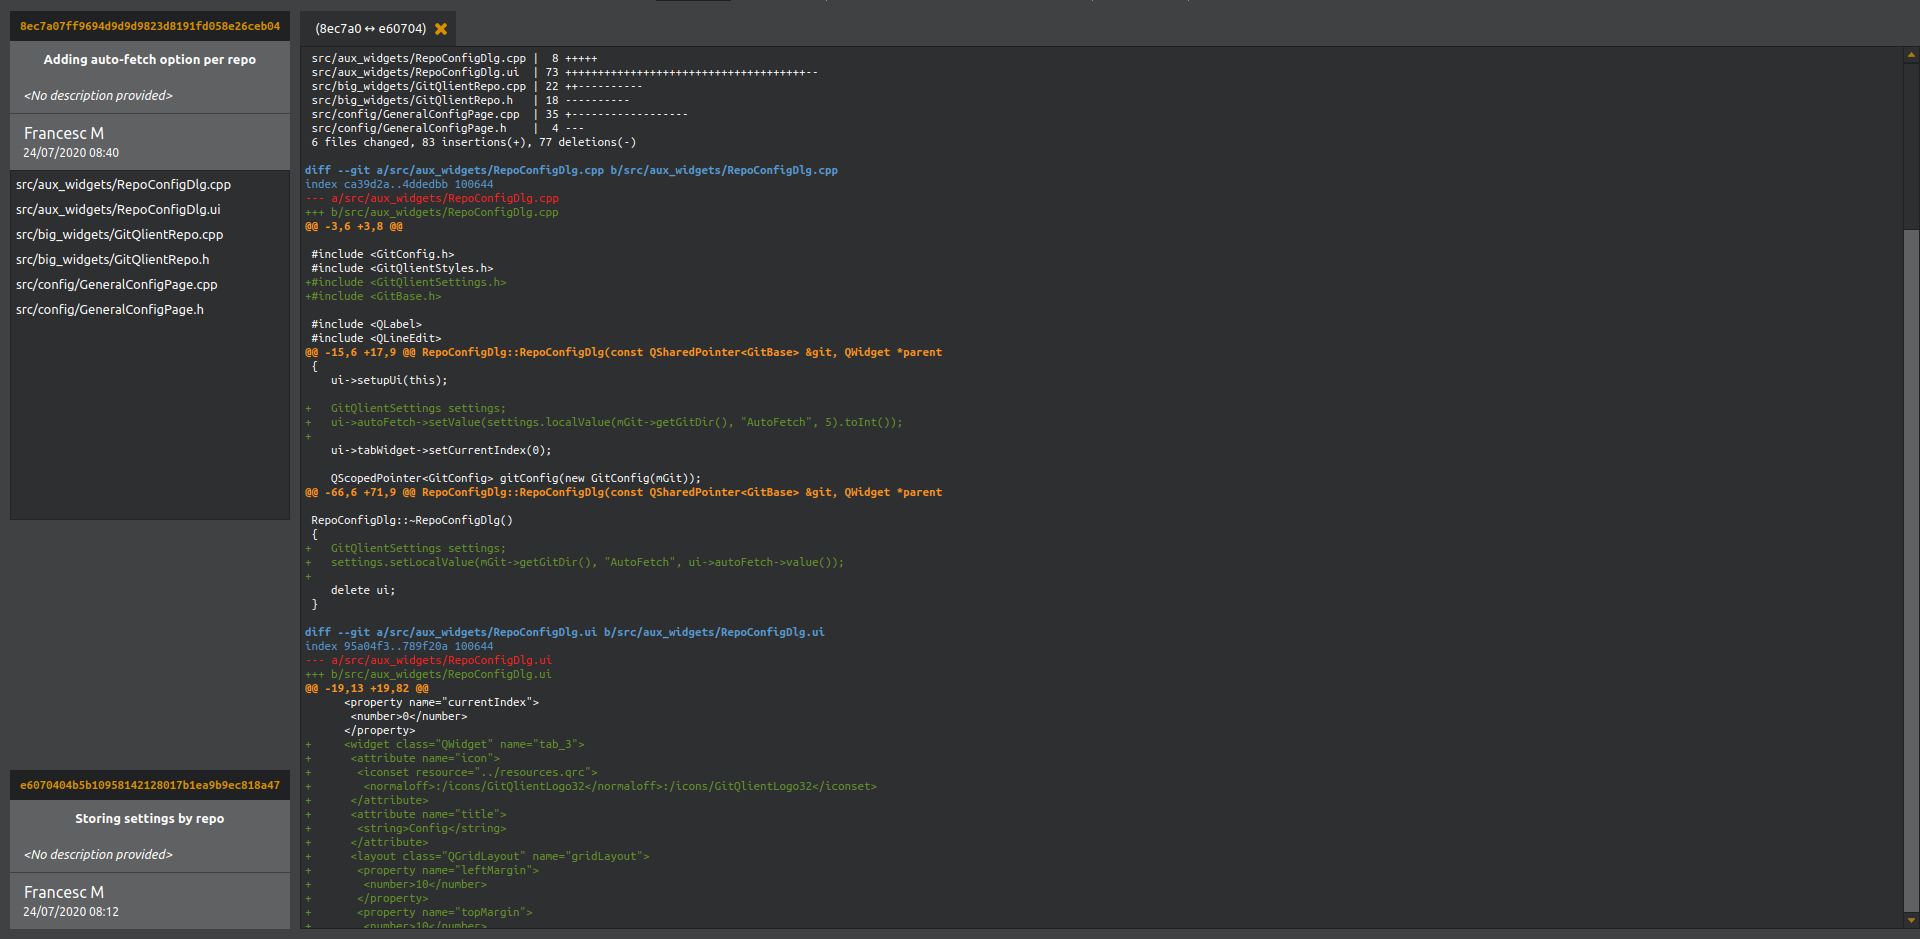
The diff view is formed by three different components:
- The file/commit diff
- The diff buttons
- The commit diff list
Indistinctly on how you open the diff view (by double-clicking a commit or by context menu), one diff implies two commits. And that’s what is shown in the view.
However, in GitQlient I didn’t want just to throw all the information in the same view and let the user deal with it. Instead, I wanted to provide an easy way to access all the diffs you open and make it easier to navigate between them and their files.
To achieve that you will find in the top left corner all the information about the base commit you are comparing as well as the list of files that have been modified compared to the commit show in the lower part. Both commit diffs and file diffs are opened now in tabs and you can open the file diffs by double clicking the file in the list or through the context menu. Once you close the last tab the view will automatically close and return to the previous window you were.
The diff view includes now two different modes: “Full file view” and “Split file view”.

Finally, both in the commit and file diff the text have different colors.
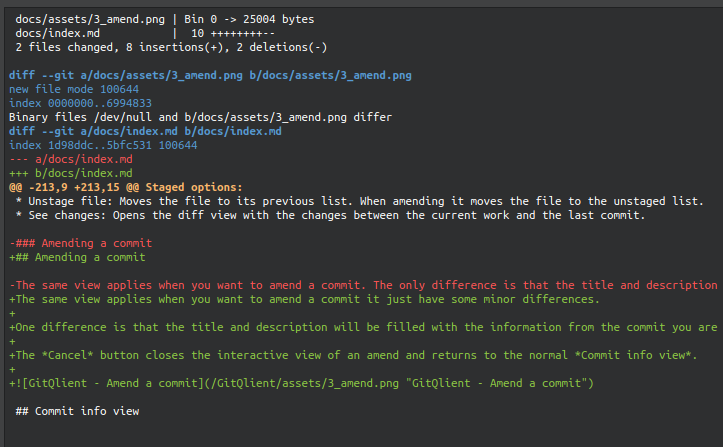
- The red color is used to indicate which lines have been removed.
- The green color is used to indicate which lines have been added.
- The blue color is used to show the file name and the commit SHAs.
- The orange color is used to emphasize the line where the changes start.
In the lower part there is the commit diff list. It shows all the files that were modified between the two selected commits, or the WIP and the last commit. The SHAs are shown in the top of the list and they pop up a tooltip with the basic commit metadata (author, date and short log message).
The Blame & History View
The Blame&History aims to be an easy to access view where you can both see the blame of a file and also when the file has been modified.
For that purpose the view is divided in 3 different parts:
- The file system view
- The commit history
- The file blame view
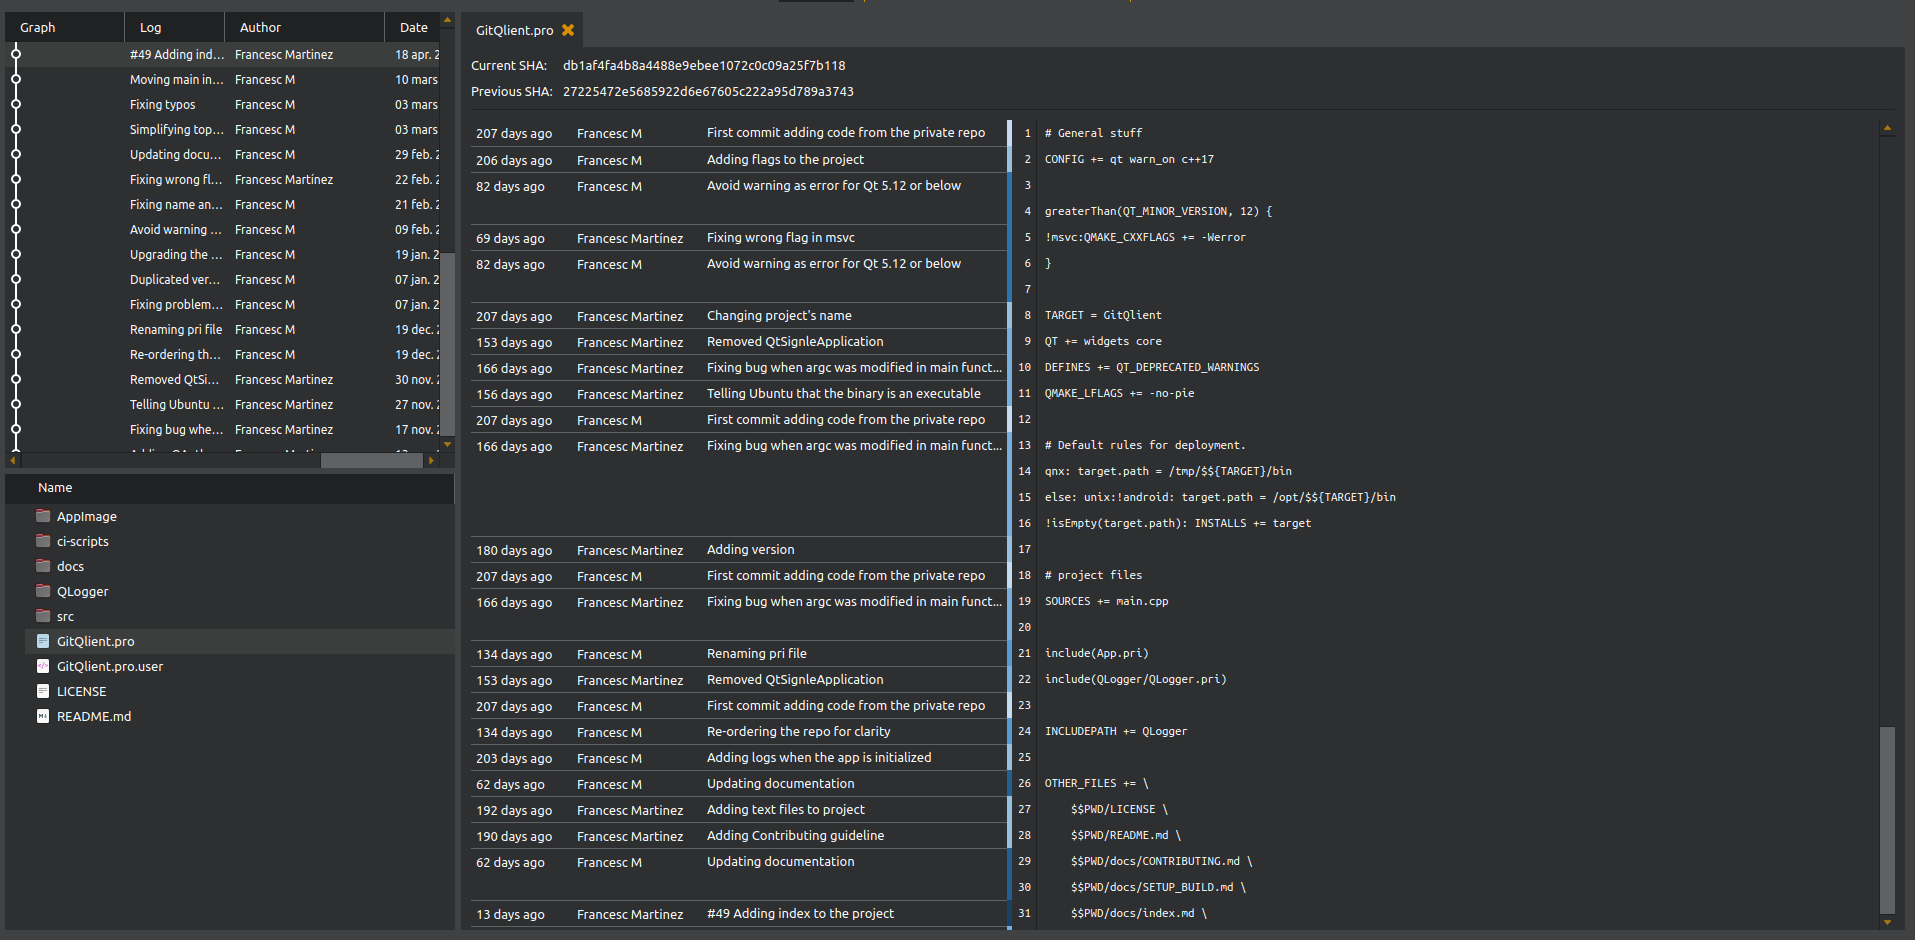
The file system view
The file system view shows all the files that are part of the current repository. When you select one of the files, its commit history will be displayed in the commit history view and its in-depth blame will be shown in the blame view.
Every time you select a different file its blame will be open in a new tab in the blame view.
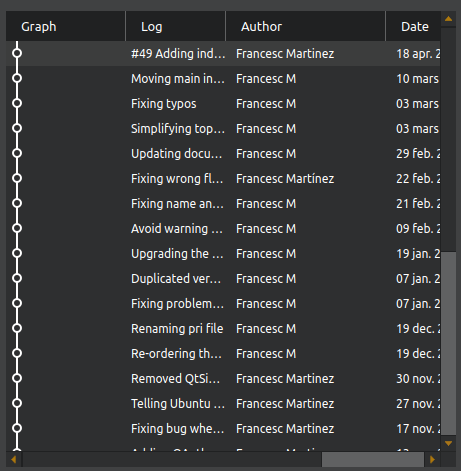
The commit history view
The commit history view is a simplified graph view as in the main window but it only shows the commits where the file previously selected in the file system view is modified.
You can navigate through the commit history and by a single click, the view of the blame will change to the file on that specific commit, refreshing the view. With a dobule click on the commit line, you will open the commit information in the diff view. It is done so you can see what were the differences between that commit and its previous one.
By using the context menu, you can open the diff of this file between the current selected commit and it’s previous one.
The blame view
This is the central part and the one that give more information. In the blame view we have as many tabs as files we’ve opened and the commit history will change when we change the blame view.
In the top part of the Blame view we find the two commits that are being compared. That will change if you select a different commit in the commit history. Under that, you will see the blame of the file where the modifications are grouped by date. In the right part, between the commit metadata and the file blame, you will find a small decoration in blue. This can be gradually painted and this indicates how recent or old a specific line is.
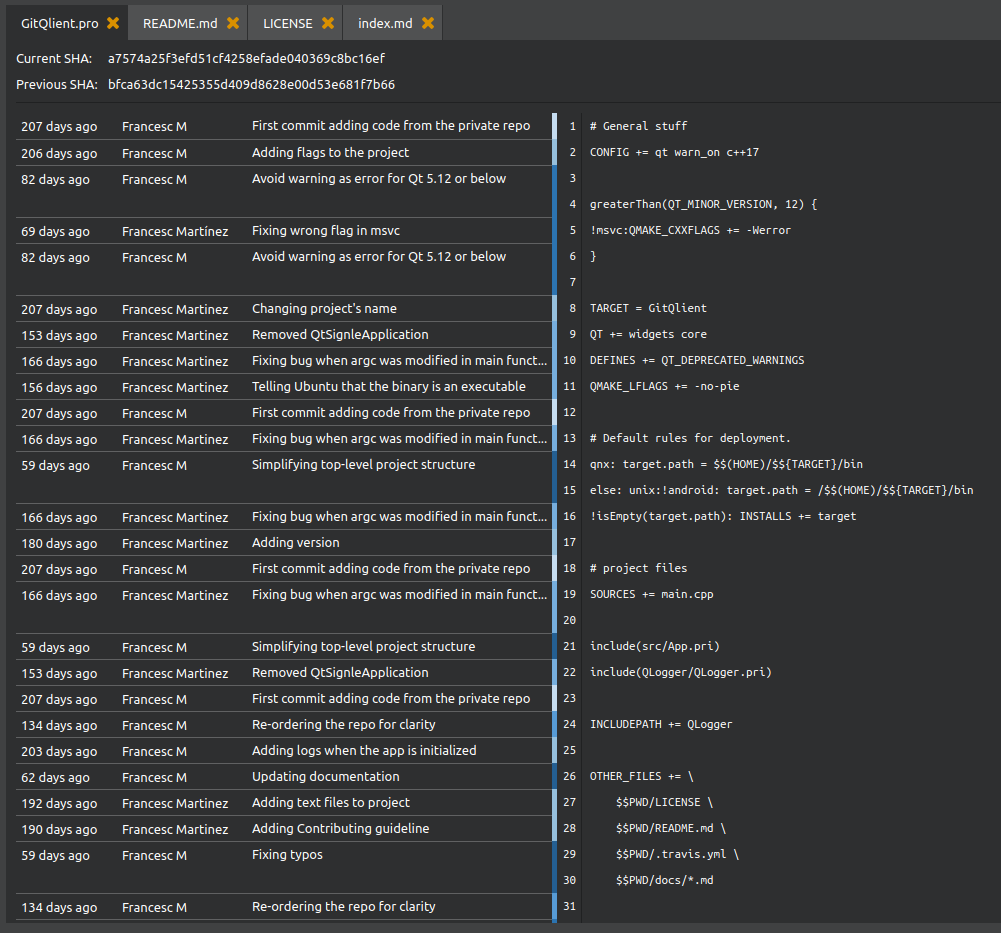
The light blue color indicates the oldest lines whereas the darkes blue tells that those lines where more recently modified.
The log message is clickable and when you clicking on it will focus the commit in the history view. This tries to be a little help to locate the commit and make it easier to compare.
The Merge View
The merge view it’s special since it isn’t accessible as a regular view. It’s only triggered when GitQlient detects that a merge, pull or cherry-pick has conflicts.
When that happens it usually starts with a warning message:
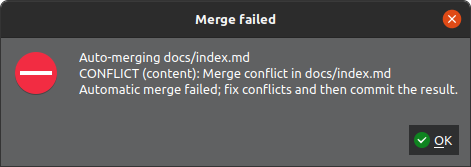
Once you exit the dialog you will be automatically redirected to the Merge view:
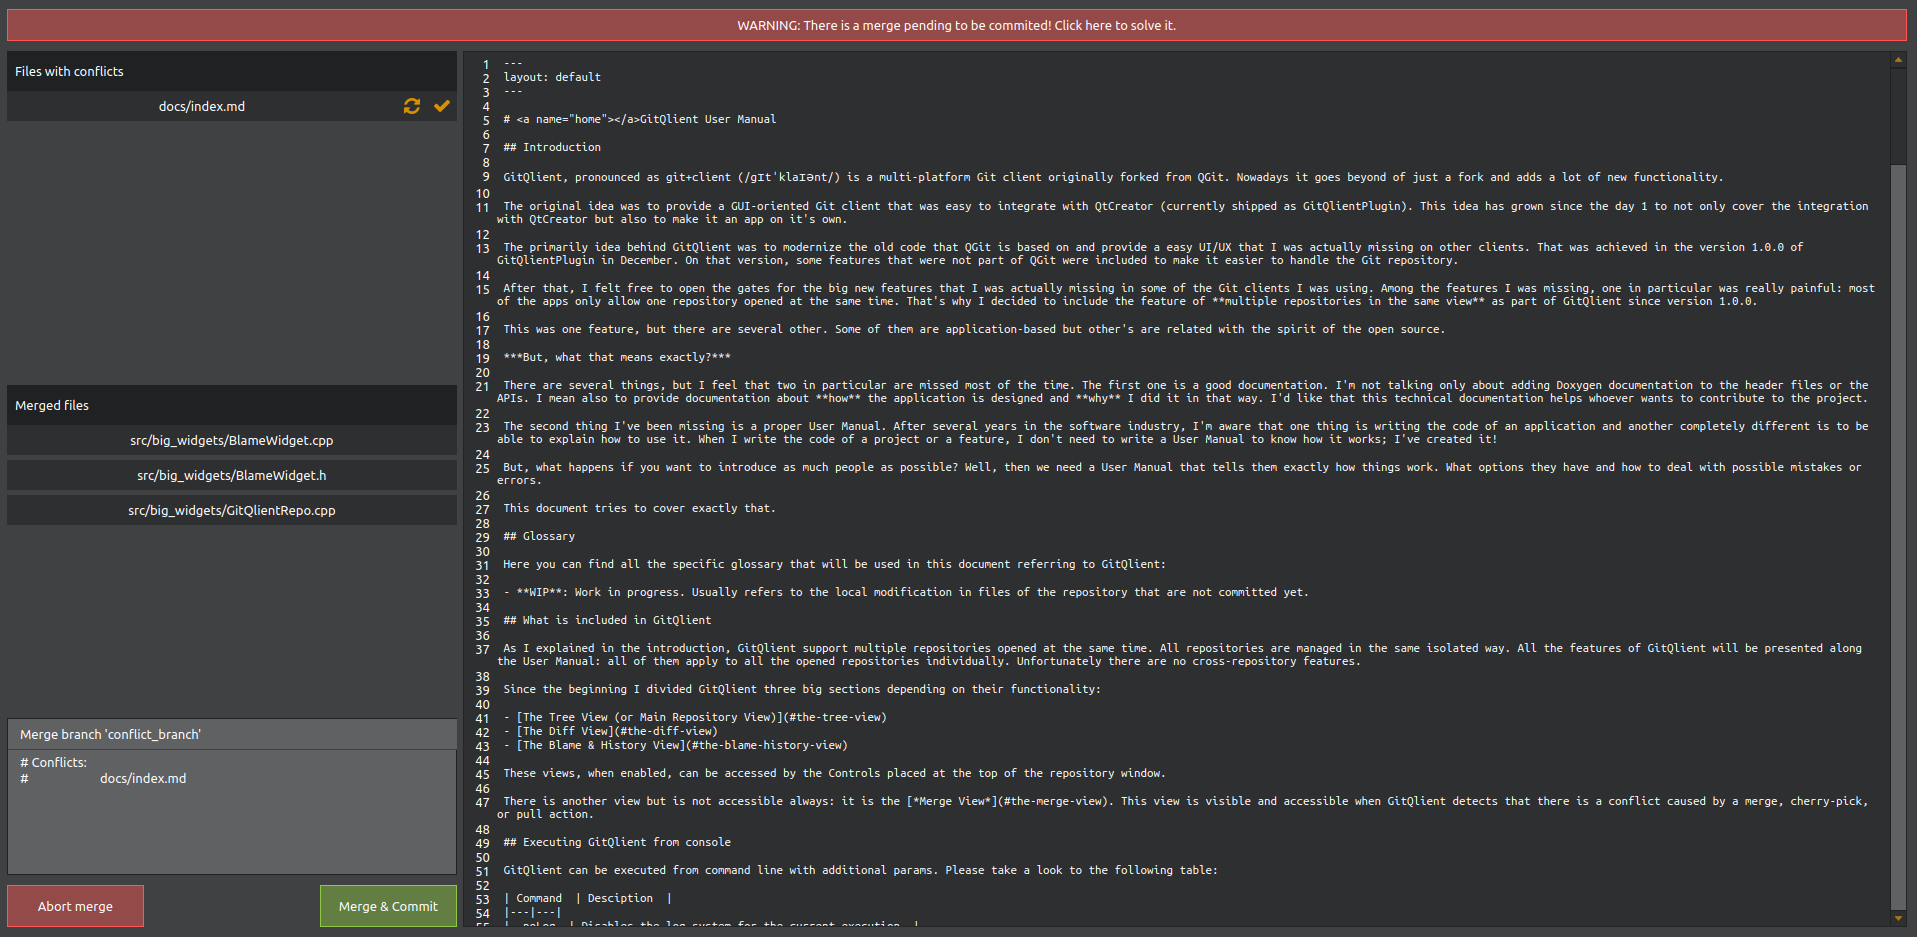
As you can see, once this view is activated a red banner will appear under the quick access buttons. It will remain there until the merge is done. It doesn’t mean you cannot do other Git actions. But you won’t be able to push anything until solved. Of course, you can still navigate between all the other views.
How to return to the merge view from other views
To return to the merge view you just need to click on the red banner.
Structure of the merge view
The merge view is divided in two different sections:
- The merge manager
- The file diff view
The merge manager is divided in three sub-sections. In the top left you can see the list of files in conflict. Every file will be a row in that list followed by two small buttons.

To show a file, you need to click over the file name (red ellipse). Once clicked, the diff view will change to show that file.
Important note: GitQlient in the current version (1.1.1) doesn’t allow to edit the files inside. To fix a file you need to edit it in a separated editor. To do that, press the file icon (orange ellipse).
Once you fix all the conflicts in the file, you can mark it as solved by clicking the check button (green ellipse). That will add the file to the list below (Merged files).
In case you want to refresh the diff view, you can click the update button (blue ellipse).
Finally, when all the conflicts are solved, you can press the **Merge & Commit” green button. That will commit the changes. By the other hand, if you want to abort the merge you can bress “Abort merge” and it will undo any changes you have done.
Appendix A: Releases
GitQlient is always under development, but you can find the releases in the Releases page.
It is planned to release for Linux, MacOs and Windows. However, take into account that the development environment is based on Linux and it will be the first platform released.
Appendix B: Build form source
GitQlient is being developed with the latest version of Qt, currently Qt 5.15. Despite is not tested, any versions from 5.12 should be okay.
Since GitQlient it’s a Git client, you will need to have Git installed and added to the path.
Regarding what parts of Qt and how to get them, I recommend to install Qt through the official installer via the Qt website. The only dependency that need to manually select is the Qt WebEngine, also included via the online installer.
If you just want to play with it a bit with GitQlient or just build it for your own environment, you will need to do:
-
Clone the repository:
git clone https://github.com/francescmm/GitQlient.git -
Or use QtCreator or run qmake in the main repository folder (where GitQlient.pro is located):
qmake GitQlient.proIf you want to build GitQlient in debug mode, write this instead:
qmake CONFIG+=debug GitQlient.pro -
Run make in the main repository folder to compile the code:
make
Appendix C: Contributing
GitQlient is free software and that means that the code and the use its free! But I don’t want to build something only that fits me.
I’d like to have as many inputs as possible so I can provide as many features as possible. For that reason I hope this guideline gives you an overview of how to contribute.
It doesn’t matter what yo know or not, there is always a way to help or contribute. May be you don’t know how to code in C++ or Qt, but UX is another field. Or maybe you prefer to provide ideas about what you would like to have.
Reporting errors
My intention is to use the features that GitHub provides. So the Issues page and the Projects page are two options to start with. I you prefer to report bugs or requests features, you can use the Issues tab and add a new issue with a label. Every label has a description but if you’re not sure, don’t worry, you can leave it empty.
Labels you can use when opening an issue:
- Bug: Bug that makes GitQlient unstable. It doesn’t crash.
- Critical bug: Bug that makes GitQlient to crash.
- Documentation: The issue is only about documentation.
- Feature: I want this amazing feature!
- Improvement: Extend functionality or improve performance of a specific topic.
- Testing: Testing related task.
Tags I will use to add additional information:
- Invalid: The issue is invalid. It could be that the behaviour is the desired, the information incorrect, etc.
- More info needed: This issue needs more information prior to investigation.
- On investigation: This issue is being investigated to see what the root problem is.
- Ready to review: Call to action: the issue is ready to review! Used to notify the person that opened the issue that is ready to be reviewed.
- Rookie task: Perfect development task to start to know GitQlient.
- Solved: This issues has been solved!
- Task: Task that is not a development issue.
If you want to report a bug, please make sure to verify that it exists in the latest commit of master or in the current version.
Implementing features or fixing bugs
If you want to implement a new feature or solve bugs in the Issues page, you can pick it up there and start coding!
If you’re familiar with Qt and/or C++, you can go directly to the features or the bugs. Otherwise, the rookie tasks are a nice way to start.
First of all, you must fork GitQlient and clone into your computer. In addition, you must have configured the original GitQlient repository to upstream:
git remote add upstream https://github.com/francescmm/GitQlient.git
When you start with an issue, make sure you create a branch from master:
git checkout dev
git pull upstream dev
git checkout -b nameOfMyBranch
Ideally, your branch name should have the following schema:
- feature/short-feature-title
- improvement/short-improvement-title
- bug/short-bug-title
- critical/short-critical-bug-title
Following these formats makes it a lot easier to know what you want to achieve and who is the responsible and aid us in getting contributions integrated as quickly as possible. Remember to follow the Code styles and the Code guidelines.
Once you are done with your changes and you have pushed them to your branch, you can create a Pull Request. Remember to add a good title and description. And don’t forget to add the label!
Code style
GitQlient follows the Qt Code Style as well as the Coding Conventions when they are not against the C++ Core Guidelines. In fact, there is a .clang-format file in the GitQlient repository you can use to format your code.
I don’t mind that you have your own style when coding: it’s easier to do it with your own style! However, before the code goes to the Pull Request you should format it so it looks as the code in the repo.
Code guidelines
Some time ago, Bjarne Stroustrup and Herb Sutter started an amazing project called C++ Core Guidelines. I know that is a large document and I don’t expect that anybody reads the whole thing or memorizes it. I won’t.
But in case of doubt, it’s the place where we should look on how to do things or why some things are done in the way they are. Having these kind of guidelines is the best way to avoid gut-feelings regarding code.
Appendix D: Recognition
GitQlient started as a fork from QGit. Despite it has changed a lot, there is some of the original code still, mainly the Git core functionality.
Even when is 100% transformed is nice to thanks those that make the original QGit possible. Please check the QGit contributors list on GitHub!
The app icon is custom made, but the other in-app icons are made by Dave Gandy from FontAwesome.
Appendix E: License
GitQlient is an application to manage and operate one or several Git repositories. With GitQlient you will be able to add commits, branches and manage all the options Git provides.
Copyright (C) 2020 Francesc Martinez
This program is free software; you can redistribute it and/or modify it under the terms of the GNU Lesser General Public License as published by the Free Software Foundation; either version 2 of the License, or (at your option) any later version.
This program is distributed in the hope that it will be useful, but WITHOUT ANY WARRANTY; without even the implied warranty of MERCHANTABILITY or FITNESS FOR A PARTICULAR PURPOSE. See the GNU Lesser General Public License for more details.
You should have received a copy of the GNU Lesser General Public License along with this library; if not, write to the Free Software Foundation, Inc., 51 Franklin Street, Fifth Floor, Boston, MA 02110-1301 USA
This is an extract of the license. To read the full text, please check it here.